How To Look Better In Photos
 Some people are just naturally photogenic. Me, I’m not one of them. I hid from cameras for most of my adult life, and tended to freeze up whenever I sensed a camera pointed in my direction. Or else, I did something goofy because, hey, I wasn’t going to look good anyway. Mostly, I just found ways to avoid being in the picture, and so have almost no photographic record of my early adult years.
But then I started writing a style blog. And people kept asking me to actually show some of the outfits I was describing. It was really hard at first. From studying other bloggers, reading online tips, working with photographers, and LOTS of trial and error, I’ve found a few practices that have helped me to look better in photos.
10 Tips To Look Better In Photos
-
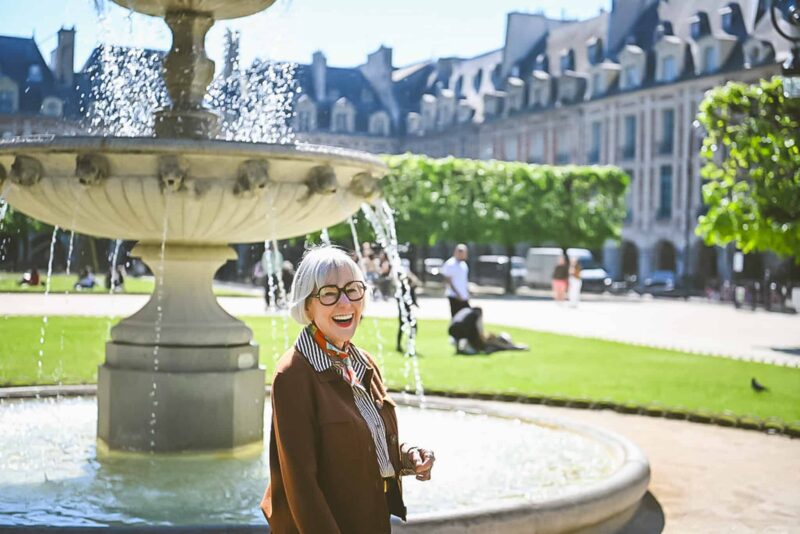
Lighting is key.
Photographers know that the best light is either early in the morning, or late in the afternoon. If you have to take photos in the midday sun or another bright light source, face the light directly to avoid sharp shadows. And always try to position yourself so that any light source is slightly above, rather than below you.
-
Moisturize.
Dry skin can look dull and lifeless in photographs, and can make you look tired. If you’re wearing makeup, you can always pat a little Clarins Beauty Flash Balm on top, or give yourself a quick spritz with a hydrating toner like this one. (Here’s another good, and more budget-friendly option.) If your hands, arms, chest, and/or legs will be in the picture, take a moment to apply a little body lotion. Many women my age were taught to fear a shiny complexion, but when it comes to most photos, a little shine is better than a very matte look. Unless your skin is VERY shiny, skip or go easy on the powder. I like this one, and will sometimes just brush lightly over my nose before a photo session. Tip: use a loose brush rather than a puff, and tap the brush to remove excess powder before applying.
-
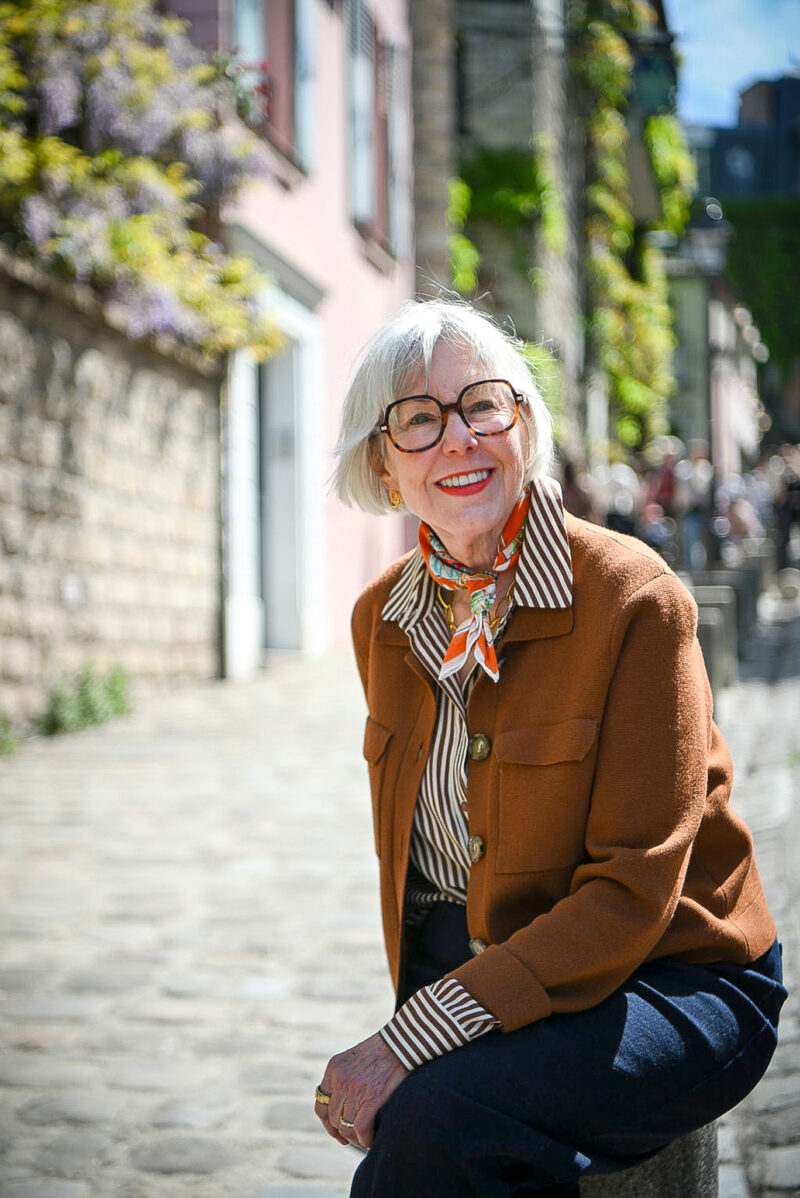
Angle your body.
Turn just a few degrees to one side or another so that your shoulders aren’t facing the camera straight on. This prevents the “mug shot” effect.
-
If it bends, bend it.
Bend one knee, or one or both elbows if you can. This not only creates a little bit of movement in a still image, but helps you look and feel more relaxed.
-
Shoulders down (relax, roll).
Many of us tend to hunch our shoulders when we’re anxious. Take a moment before the shutter snaps to give your shoulders a quick roll, and pull them down.
-
Think “turtle”.
Many of us also tend to pull our chins back in toward our neck when we smile. This can create or accentuate a double chin, and makes one’s face blend into the neck. Instead, think of a turtle pulling it’s head out of it’s shell…extend your chin slightly down and forward.
-
Shake, bark or sing to relax the jaw.
After I’ve been posing for more than a minute or two, my jaw tends to clench which makes me look like I’m grimacing rather than smiling. When I did a photo session with Carla Coulson in Paris a couple of years ago, she’d yell “bark like a dog!” at me every few minutes. I’d bark, we’d both laugh, and my face would relax. Another trick is to cluck your tongue against the roof of your mouth (like telling a horse to “giddyup”) which also keeps the facial muscles relaxed.
-
Space is the place.
Be aware that if the camera is within a few feet, your body and/or face will often be distorted. Whatever is closest to the lens will appear largest (especially true with flat lenses like smart phone cameras). If you can get some distance between you and the photographer, great! (If you’re too small in the photo, have them zoom in a little. Not too much, or you’ll get a grainy image.) If space is limited, try shifting the camera angle to minimize distortion.
-
Practice, practice, practice!
Like that old joke about getting to Carnegie Hall… Most of us are not savants when it comes to being photographed, so practices poses, stances, angles until you figure out what you like best. You’ll find after a while the “muscle memory” will kick in, and you’ll be able to hit your best poses without a lot of effort.
-
Ease up on yourself.
This is probably the most important thing. So often we’re too hard on ourselves, and (even if unconsciously) compare our photos to professional, heavily photoshopped images, or an influencer’s carefully curated Instagram feed. When I look back over my “camera phobic” years, the few photos that I liked and kept weren’t the ones where I looked the thinnest or prettiest. They were the ones where I looked the happiest and most relaxed.
Are there any tricks you use to feel more comfortable in front of the camera?
Ready For My Closeup…
Stay in touch
Sign up to be notified of new posts and updates from une femme d’un certain âge.
Thank you. Great helpful post!
Glad that most of your photos aren’t the ubiquitous ‘does she have to pee?’ type. We see that pose everywhere, especially on TV. After awhile it looks weird. I was watching an entertainment show and every female host looked like she desperately had to run ‘au petit coin’. I love the top photo ( I believe you were at a desert wedding) You look so fresh and shows off your outfit to its best advantage.
Thank you so much for these tips! I also tend to avoid having my picture taken for these very reasons, The turtle tip is especially helpful, lol. And thank you for sharing product tips for the older woman. We are often forgotten in the beauty world, aren’t we? One of the many reasons I love reading your blog – you remind me that we can be stylish, relevant and most definitely beautiful!
Great post! I hate getting my picture taken too. Thanks for the tips!
Really helpful post – Thanks!
Supposedly it helps to press your tongue against the roof of your mouth while you smile, which sounds a lot like your suggestion about clucking your tongue. You look great in your pictures, so I’ll try to do better at bending my arms and legs.
Sorelle Amore has many tips for taking photos of yourself. She has a selfie university series on Youtube too.
These are great tips Susan. I cannot believe you were camera shy for most of your life!
Isn’t it amazing how we can change when we really want to?
I’ve often thought about writing a post like this but now there’s no need, you’ve done a brilliant job x
Thanks for the great tips! People take so many more photos then when I was younger. Its so easy now when everyone has a smart phone. The “turtle tip” is a good one. And so is bending knees and elbows. I hope to make your tips second nature so almost all my photos are keepers. There’s no destroying negatives anymore. Wink wink.
In a mix of #6 and #8, if you are shot from slightly above, you will look slimmer (your head will be bigger compared with your body) and your chin will be up (and any doubles will be hidden by the angle).
Since I started Pilates, I make a big effort to stand straight with my neck stretched and my shoulders down. And I notice how many people have let their shoulders creep up.
I had the same thought and wondered if Susan’s newfound Pilates practice had informed her tip #5 (Go Susan!). As a Pilates instructor, I tell my clients, “Shoulders down and collarbones wide!” It’s a visual 5-pound slimming trick, too.
Thanks, I needed this. My photos never look like I imagine myself looking.
Good tips, Susan. I usually forget to roll my shoulders back and pull my head out/forward, also my face tends to get tense as I’m concentrating on photo setup. My photos are all either done with a delay-timer on my DSLR or a remote with my phone, although the quality isn’t as good with my phone. Practice is key. I also look at other bloggers’ photos to get ideas. Sometimes, I think it’s just luck!
Great tips, Susan! I’m always looking to improve the photos on my Fashion Friday posts, so I will definitely be keeping your suggestions in mind. Thank you!
Good tips. I’ve spent a while studying poses for pictures and the subject isn’t easy or intuitive. You’ve mastered some good ones.
Very helpful. I hate my aged hands in recent photos. Tucking one into a pocket looks relaxed. The other can be hidden behind my hip with that bent elbow you suggest. Problem solved!
In summer, I love the look of a pretty straw hat to balance my shoulders and hide travel hair!
Thank you.